

How To Set User Name In Windows 10
On Windows ten, yous would usually create an account during the initial setup experience. However, at that place are many other settings you tin can configure to enhance the account and make it even more secure.
In addition, you tin as well create additional accounts with different permission levels to share a Windows 10 estimator with family unit and friends. This ways everyone would have a personal space with a personalized feel and a split up area to shop files.
If you want to share a device with a young person, Windows too includes the ability to create a child account with features specifically designed to protect them from content (such as apps, games, and websites) that may not exist appropriate for their age.
In this Windows 10 guide, we volition walk you through the steps to create and manage user accounts on your computer.
- How to view account details on Windows 10
- How to add more email and app accounts on Windows x
- How to manage account sign-in options on Windows 10
- How to connect to an arrangement on Windows x
- How to create multiple accounts on Windows ten
- How to remove an business relationship and data on Windows x
- How to manage account sync settings on Windows 10
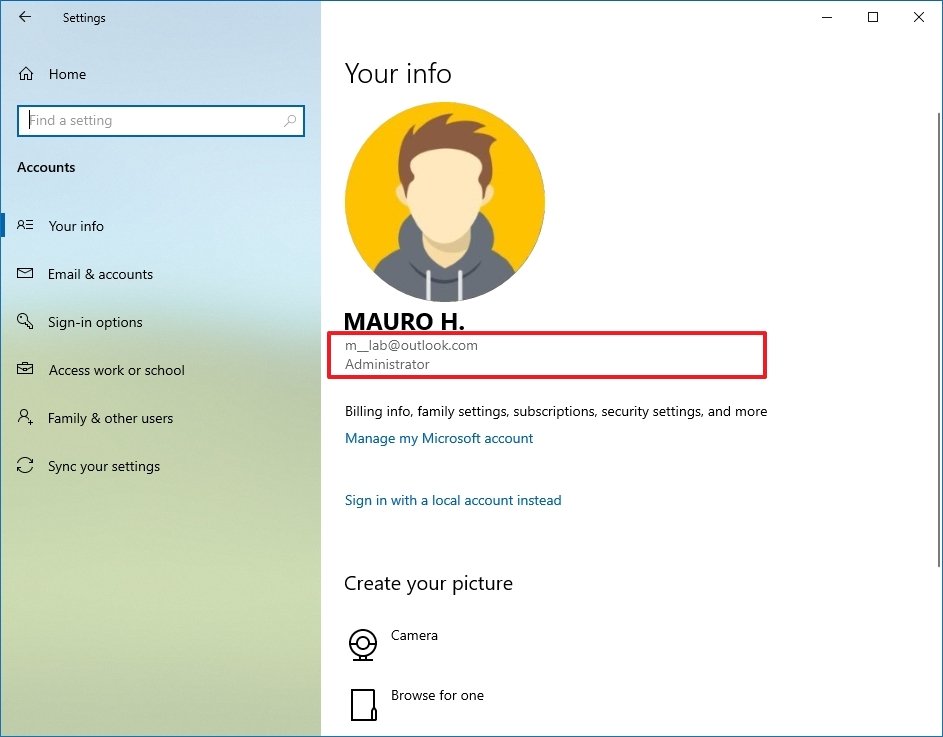
How to view business relationship details on Windows x
In the Settings app, the Your Info page includes your account information and the option to connect your local account to a Microsoft account. In addition, on this page, you can too modify the contour moving-picture show.
View business relationship data
To view your Windows 10 account details, apply these steps:
- Open Settings.
- Click on Accounts.
- Click on Your info.
-
Confirm your account details, including business relationship type (Administrator or Standard) and whether you're using a local account or Microsoft business relationship.
 Source: Windows Central
 Quick note: If the page reads "Local account" under your username, the account isn't connected to a Microsoft business relationship. If your email address appears on this page, you're using a Microsoft account.
- (Optional) Click the Manage my Microsoft account option to conform billing details, family and security settings, and other settings online.

Once y'all consummate the steps, yous'll better understand the business relationship data on Windows ten.
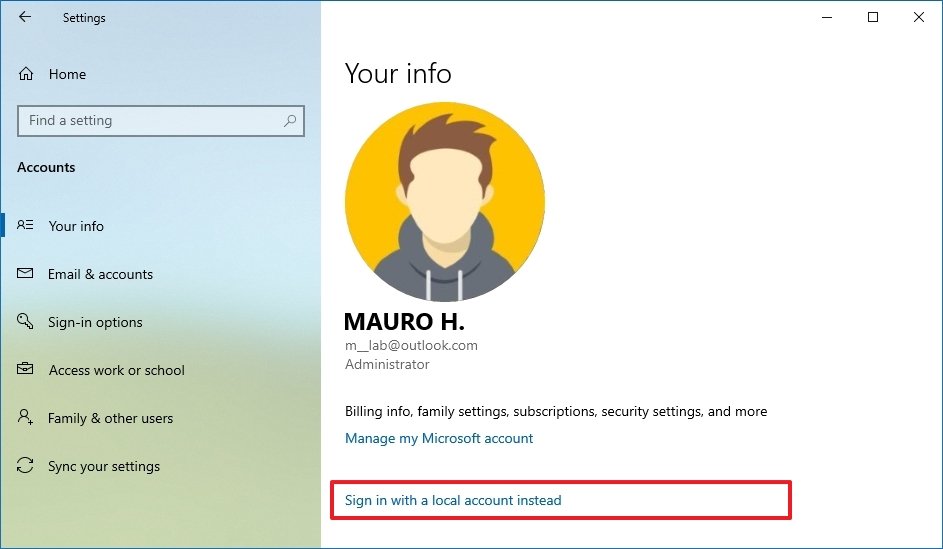
Switch to local or Microsoft business relationship
To switch from a local business relationship to a Microsoft account, use these steps:
- Open Settings.
- Click on Accounts.
- Click on Your info.
-
If you have a local account, click the Sign in with a Microsoft account instead option to link the business relationship with a Microsoft business relationship.
 Source: Windows Fundamental
 -
Continue with the on-screen directions.
Quick tip: If this is a new account, y'all may demand to click the Verify button to verify your identity. Only after entering the verification code, you'll be able to accept full access to the business relationship.
- If you take a Microsoft account, click the Sign in with a local account instead option to switch to a local account.
- Continue with the on-screen directions.

After you lot complete the steps, the account will switch to a Microsoft or local account, depending on your configuration.
Alter account picture
To modify your Windows ten account picture, utilise these steps:
- Open Settings.
- Click on Accounts.
- Click on Your info.
-
Nether the "Create your picture" section, click the Scan for one button.
 Source: Windows Cardinal
 Quick tip: You can also use the Camera option to take a picture with the webcam and ready it as your profile picture.
- Select a new prototype for the account.
- Click the Choose Movie button.

In one case yous complete the steps, the account pictures volition appear across Windows 10 experience, including the Sign-in screen.
How to add more e-mail and app accounts on Windows 10
Windows x also allows yous to add together multiple accounts, so you don't have to re-enter the aforementioned information to admission an app or service.
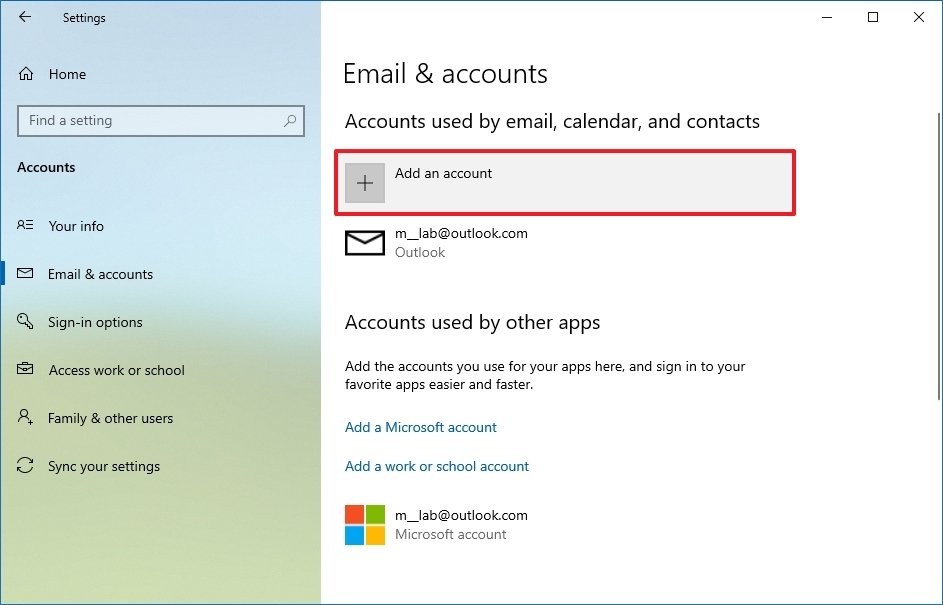
Add accounts for apps
To prepare up additional email and app accounts on Windows x, use these steps:
- Open Settings.
- Click on Accounts.
- Click on Email & accounts.
-
Nether the Accounts used by email, agenda, and contacts section, click the Add together an account button.
 Source: Windows Fundamental
 Quick note: If you want to add another Microsoft account, the system will also list it under the "Accounts used past other apps" section.
- Select the service provider — for example, Outlook, Google, or iCloud.
- Keep with the on-screen directions.

Later you complete the steps, the business relationship data will be available to connect with Microsoft Store apps.
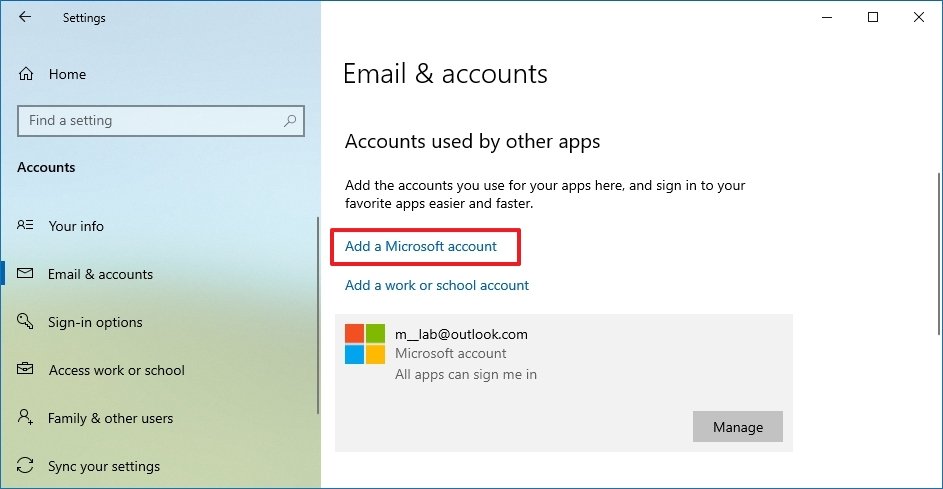
Add accounts for piece of work
To add work accounts for apps, apply these steps:
- Open up Settings.
- Click on Accounts.
- Click on Email & accounts.
-
Under the "Accounts used by other apps" section, click the Add a Microsoft account or Add a piece of work or school account.
 Source: Windows Central
 - Select the correct service.
- Continue with the on-screen directions.

One time you complete the steps, yous will exist able to quickly set upward apps for work, such every bit OneDrive for business.
How to manage account sign-in options on Windows ten
On the Sign-in options page, yous can also manage dissimilar authentication methods. For example, you can modify your account password, configure Windows Hello Face up, PIN, Security Central, or Moving-picture show countersign, and you can even set Dynamic Lock to lock the computer equally yous pace away from the room.
Change account password
The option to modify the password is only available for local accounts. If you have a Microsoft business relationship, the option to change password or picture password won't be available. In this instance, y'all will demand to change your account countersign online.
To alter the account password on Windows 10, utilise these steps:
- Open up Settings.
- Click on Accounts.
- Click on Sign-in options.
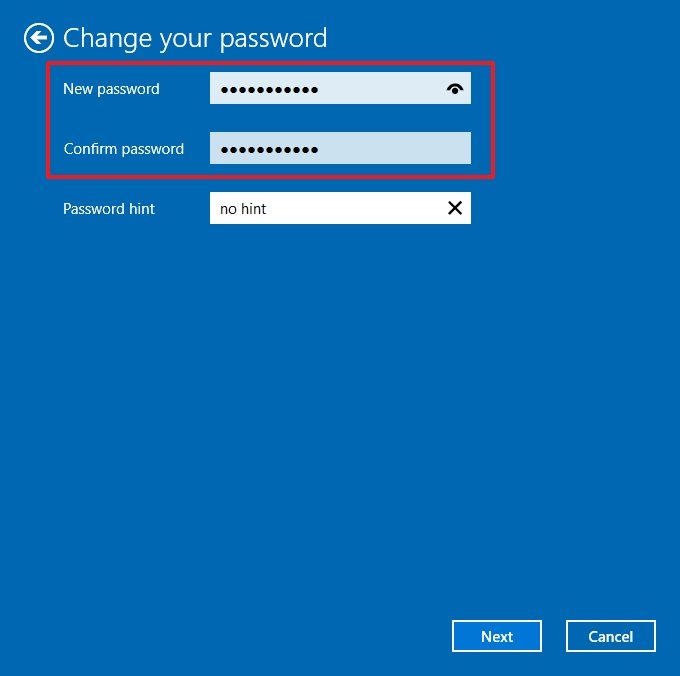
- Under the "Manage how you sign in to your device" section, select the Password pick.
-
Click the Change button.
 Source: Windows Central
 - Confirm the current password.
-
Confirm the new countersign.
 Source: Windows Primal
 Quick note: You tin can't re-employ a previous password. You must enter a new countersign.
- Click the Next button.
- Continue with the on-screen directions (if applicable).


After y'all consummate the steps, the new countersign will employ to the account and across devices and other Microsoft services.
Create Windows Hello PIN
On Windows ten, you lot can too use a Pivot instead of a countersign to make the account more than secure and faster to access.
To create a PIN on your Windows 10 business relationship, use these steps:
- Open Settings.
- Click on Accounts.
- Click on Sign-in options.
- Under the "Manage how you sign in to your device" section, select the Windows Hello PIN option.
-
Click the Add push.
 Source: Windows Primal
 - Confirm your electric current password.
- Click the OK button.
-
Create a new Pin.
 Source: Windows Central
 Quick tip: Y'all can besides check the available choice to allow letters and symbols as part of your Pivot to create something similar to a password but locally available.
- Click the OK button.


One time yous complete the steps, you can commencement using the Pin instead of a password to sign into your business relationship.
By and large speaking, a Pivot is more secure than a password because it's only tied to 1 device, and it's never transmitted over the network, and it only works locally. Y'all can't utilise it to access your device remotely, and you need to set it per device.
It's worth noting that in a Microsoft account, you lot will simply discover an selection to change your Pin since the system now forces you to create a PIN during the account setup.
Create pic countersign
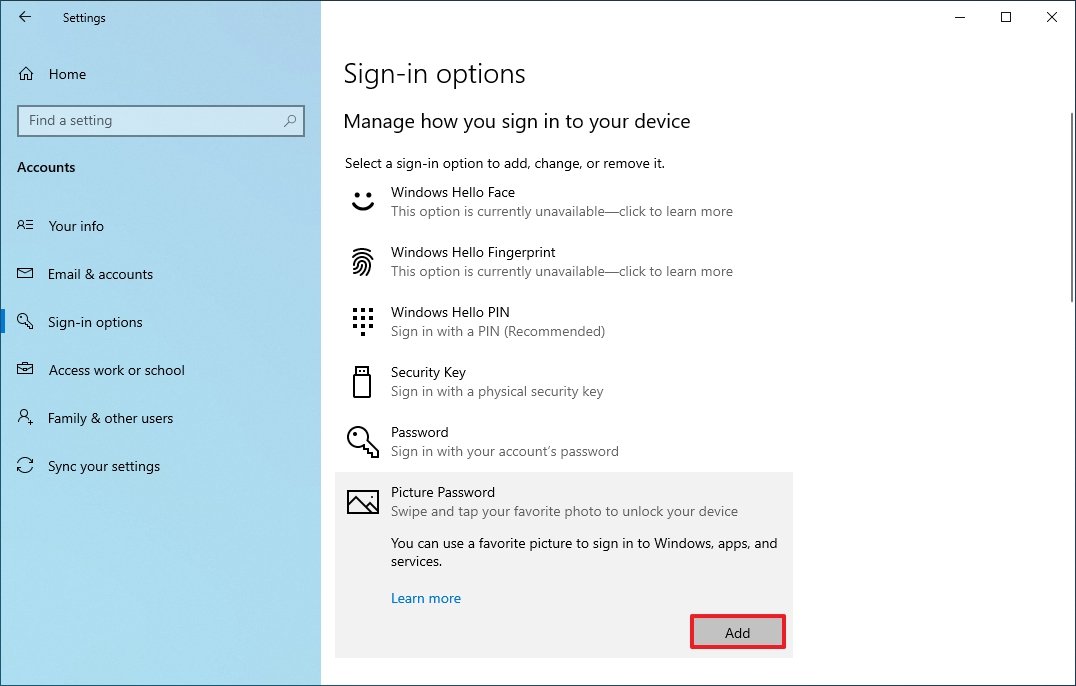
If you are using a local account on a touch-enabled device (such as a Surface Pro eight, Laptop iv, or Go 2), Windows x includes a characteristic that lets yous employ a moving-picture show as a password.
To configure a moving picture password on Windows x, use these steps:
- Open up Settings.
- Click on Accounts.
- Click on Sign-in options.
- Under the "Manage how y'all sign in to your device" section, select the Picture Password choice.
-
Click the Add push.
 Source: Windows Fundamental
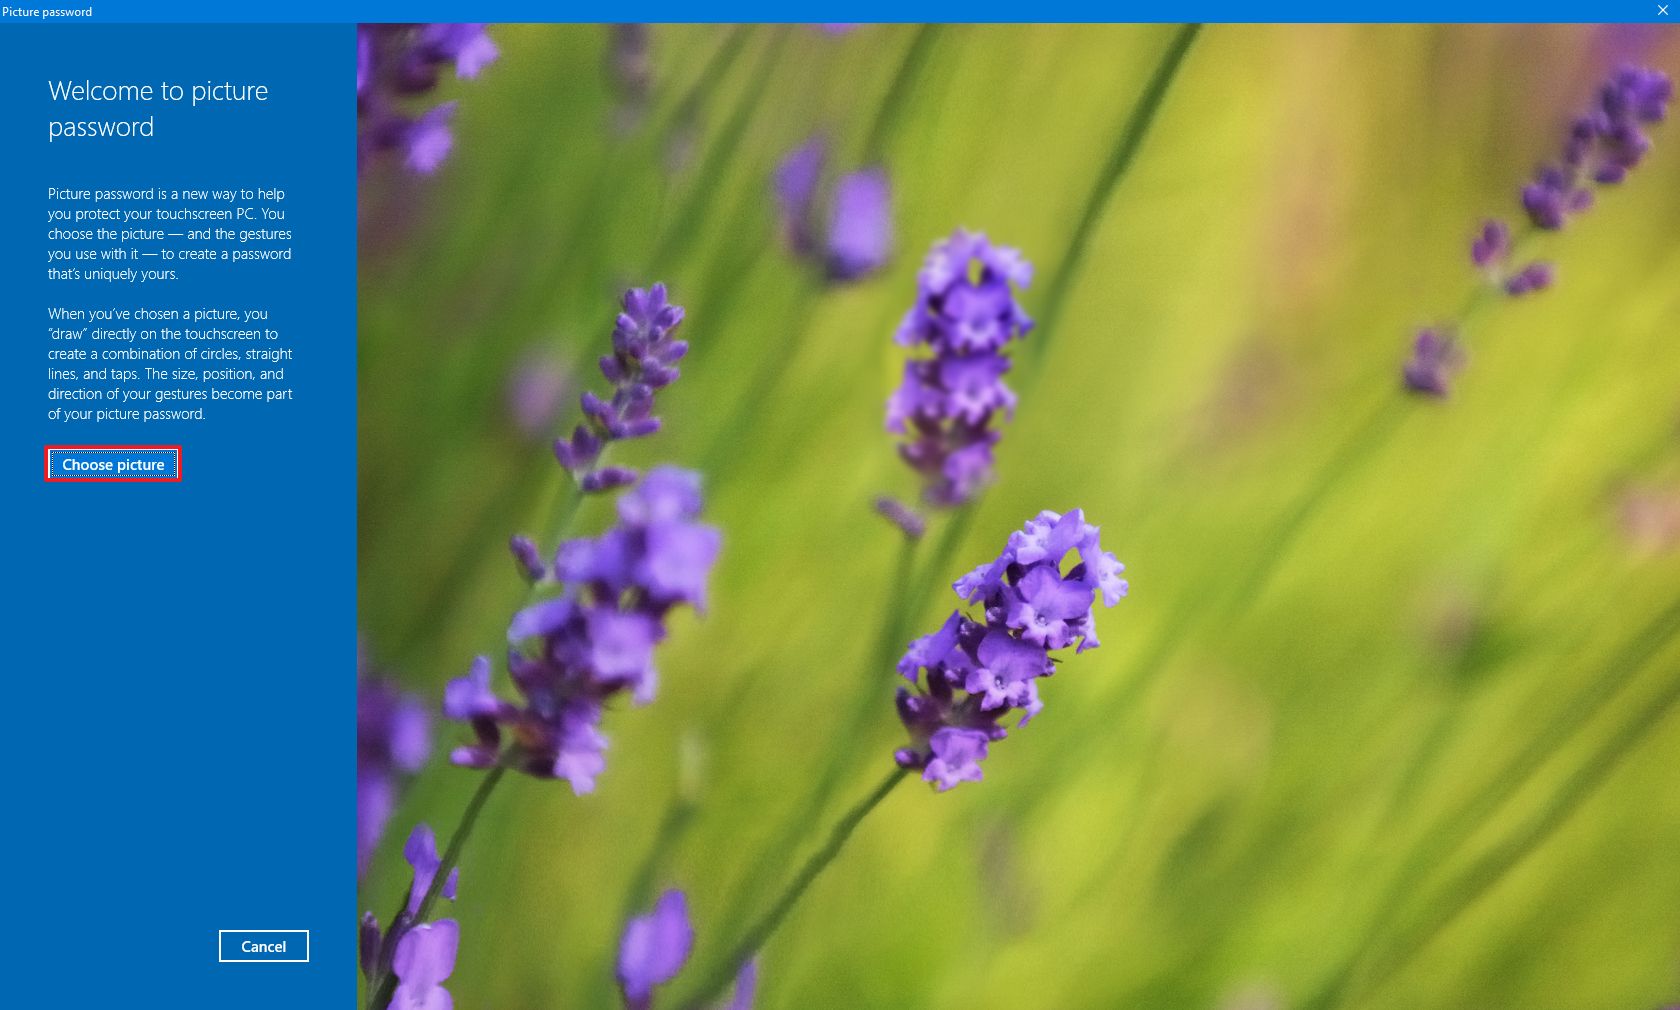
 - Confirm the current password.
-
Click the Choose film button from the left pane.
 Source: Windows Cardinal
 - Select a new image to set every bit password.
- Click the Open up button.
-
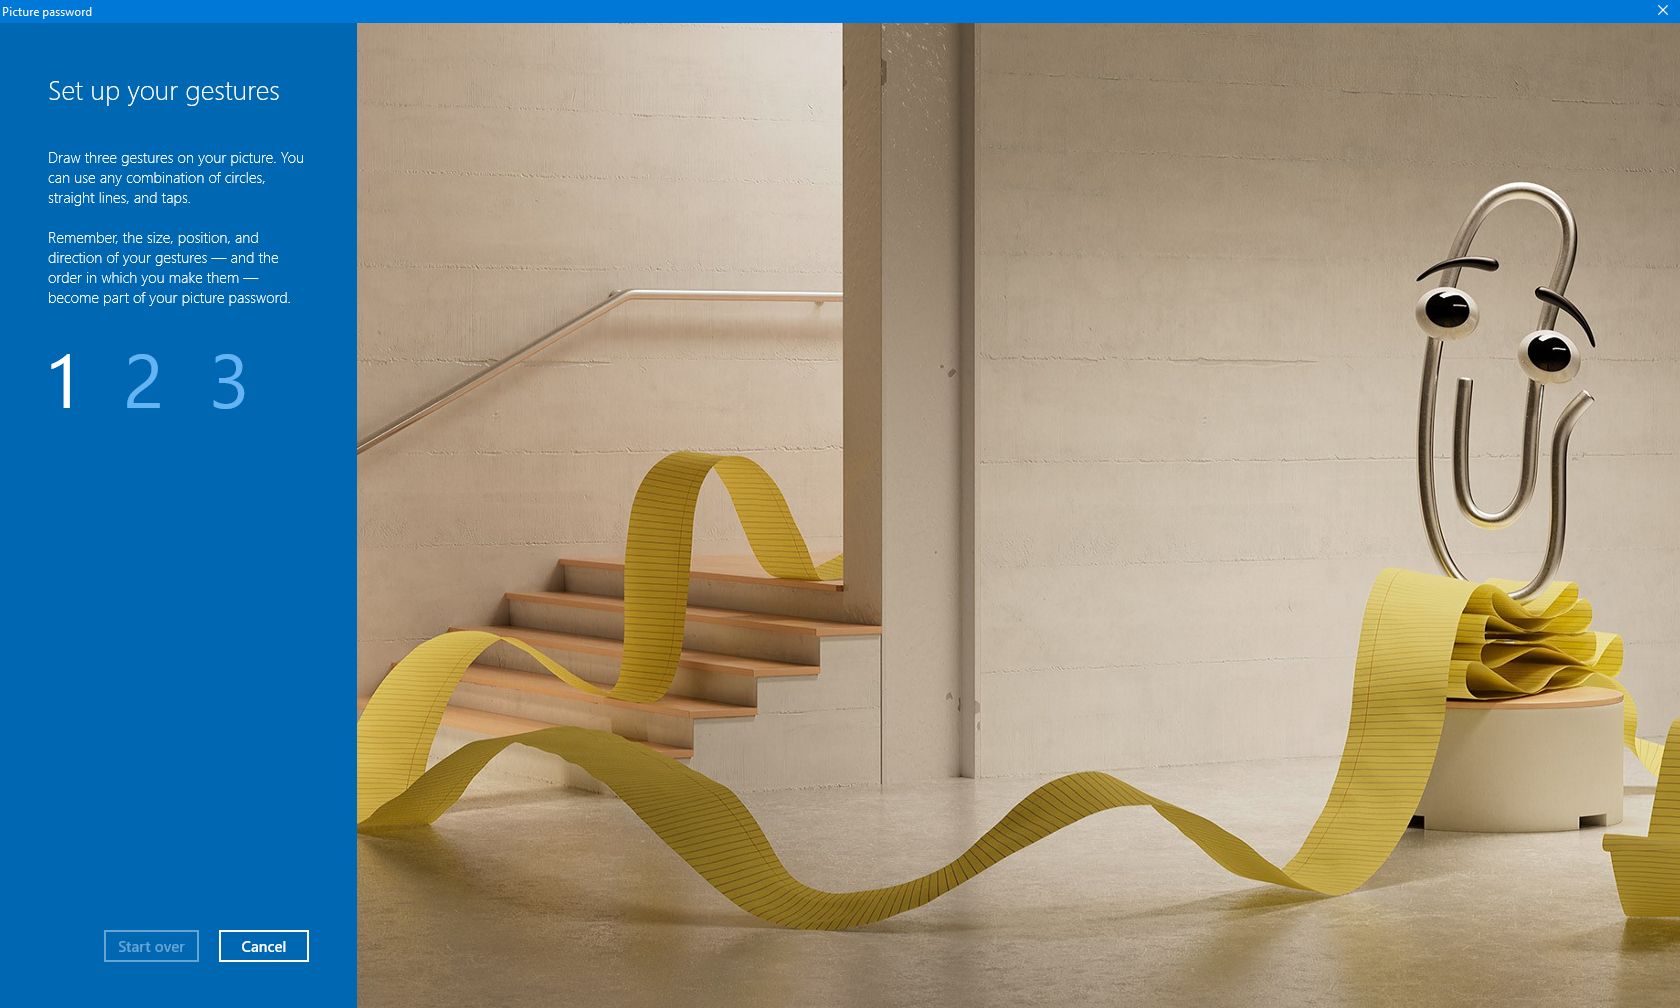
Click the Apply this picture push button.
 Source: Windows Central
 -
Ostend three gestures on the image, including circles, straight lines, taps, or a combination of the three, which you lot'll use equally a password.
 Source: Windows Primal
 - Repeat the gestures to confirm.
- Click the Finish button.


After you lot complete the steps, sign out of the business relationship, and when you try to sign back in, you volition use the gesture patterns you configured to sign in.
On compatible devices, such as Surface Laptop 4 and Surface Pro 8, y'all tin also configure Windows How-do-you-do Face to sign into your device using facial recognition.
If your device doesn't include biometric authentication hardware, you tin ever become a fingerprint scanner addition or a camera with Windows Hello support.
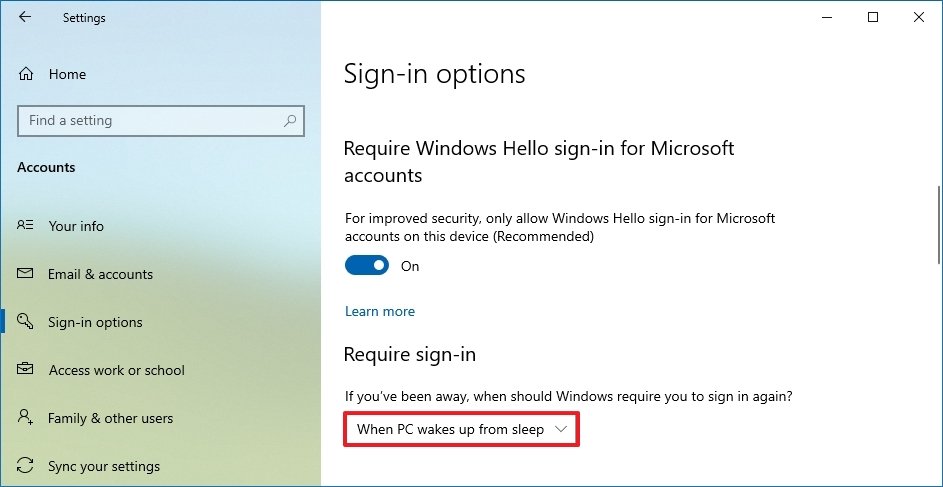
Require password on wake
You tin can also decide whether the arrangement should prompt you to enter a countersign when the computer wakes upwardly from sleep.
To enable or disable sign-in on wake on Windows 10, use these steps:
- Open Settings.
- Click on Accounts.
- Click on Sign-in options.
-
Under "Crave sign-in," utilise the driblet-downward menu and select:
- Never — a password won't be required after the reckoner resumes from sleep.
- When PC wakes upwards from slumber — you volition need to enter a password when your calculator resumes from sleep.
 Source: Windows Fundamental

One time you consummate the steps, sign-in will be required when the device wakes upwards from sleep, depending on your configuration.
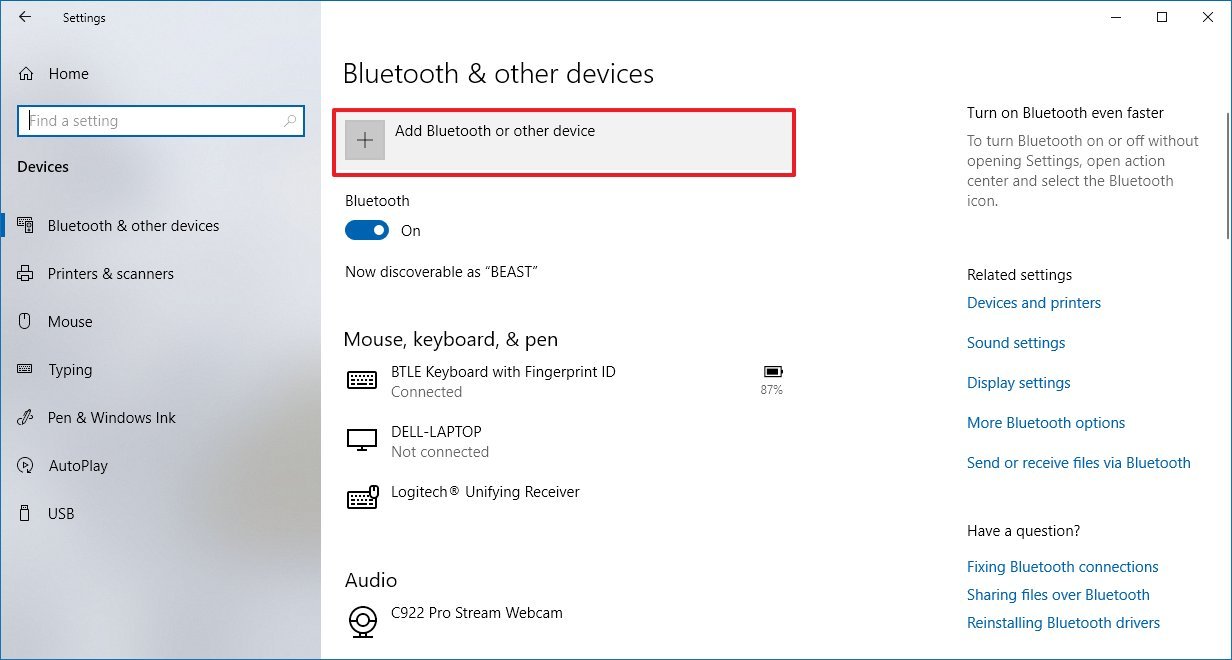
Enable Dynamic lock
Dynamic Lock is a security feature that locks your estimator when you step away from the room. The feature uses proximity technology, which means that y'all'll demand to connect a Bluetooth device like a telephone or wearable earlier y'all can configure it. After it's enabled, if you step away with the Bluetooth device, after thirty seconds, Windows ten volition lock automatically.
To enable Dynamic Lock on Windows 10, use these steps:
- Open Settings.
- Click on Devices.
-
Click on Bluetooth & other devices.
 Source: Windows Central
 -
Click the Bluetooth option.
 Source: Windows Central
 - Turn on Bluetooth on the device you desire to pair.
-
Select the device from the list.
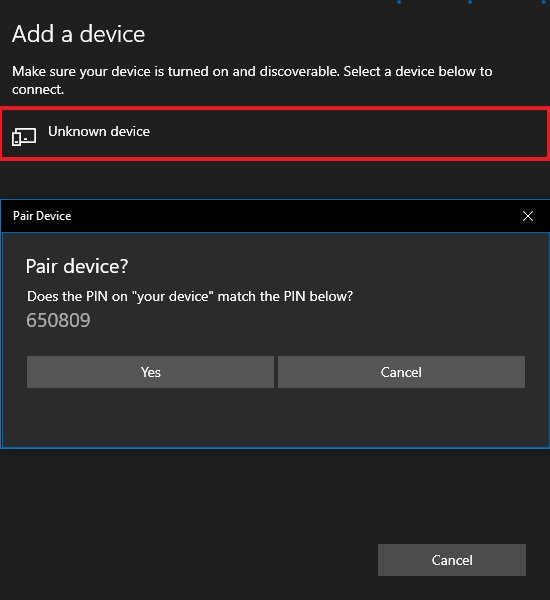 Source: Windows Central
 - Proceed with the on-screen directions to complete the pairing.
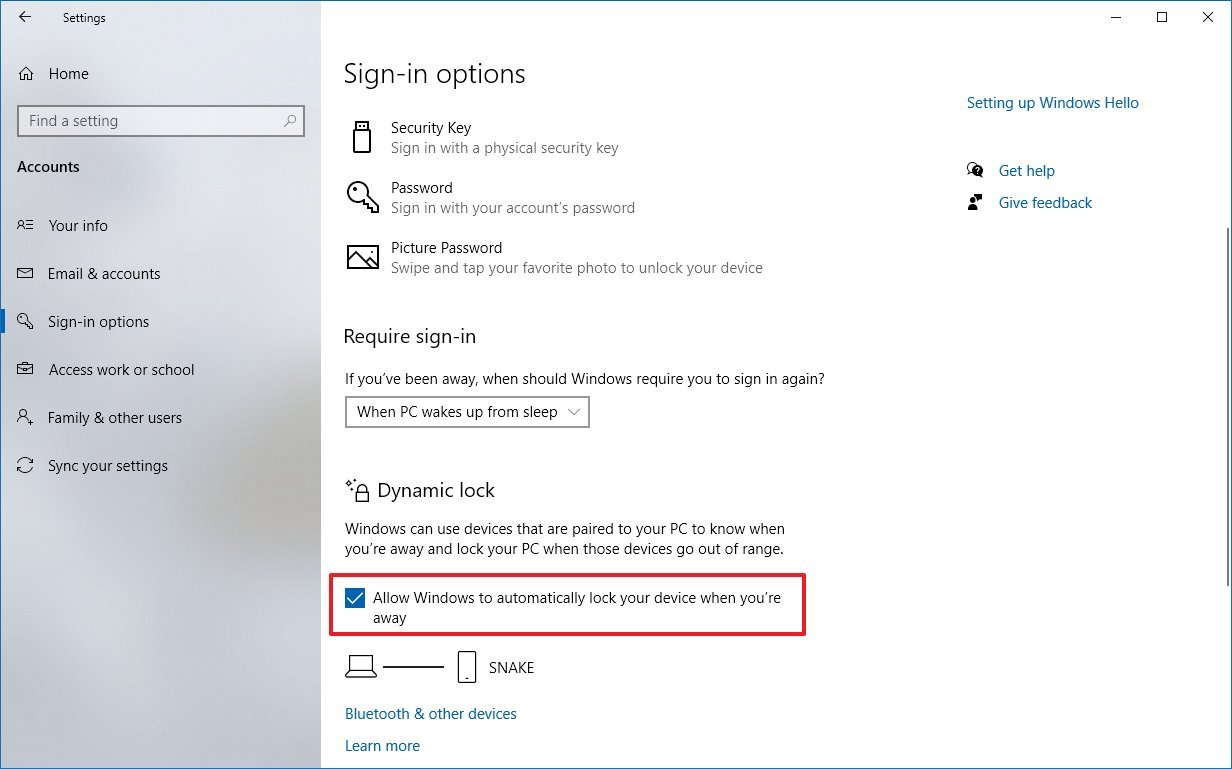
- Click the Home button.
- Click on Accounts.
- Click on Sign-in options.
-
Nether the "Dynamic lock" section, cheque the Allow Windows to automatically lock the device when yous're abroad toggle switch.
 Source: Windows Cardinal


Once you consummate the steps, yous can examination the characteristic by stepping away from the room with your Bluetooth device, and then later thirty seconds, Windows x should lock the laptop automatically.
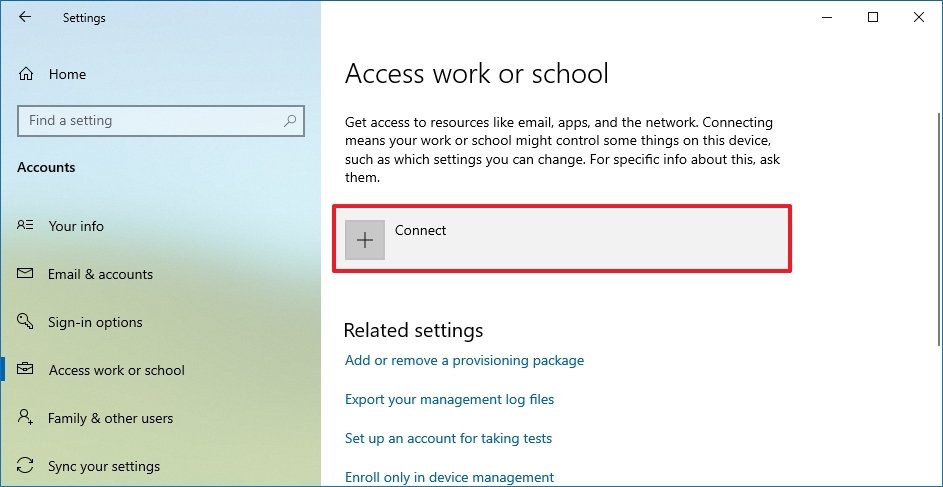
How to connect to an organization on Windows x
On the "Access work or schoolhouse" page, you will find the settings to connect to an arrangement to access shared resources, such equally network resources, apps, and emails.
Typically, if y'all work in an organization, the network administrator volition provide the information to add the device to the network.
To connect a device to the network, utilise these steps:
- Open Settings.
- Click on Accounts.
- Click on Access work or schoolhouse.
-
Click the Connect button.
 Source: Windows Primal
 -
Confirm your work or school account.
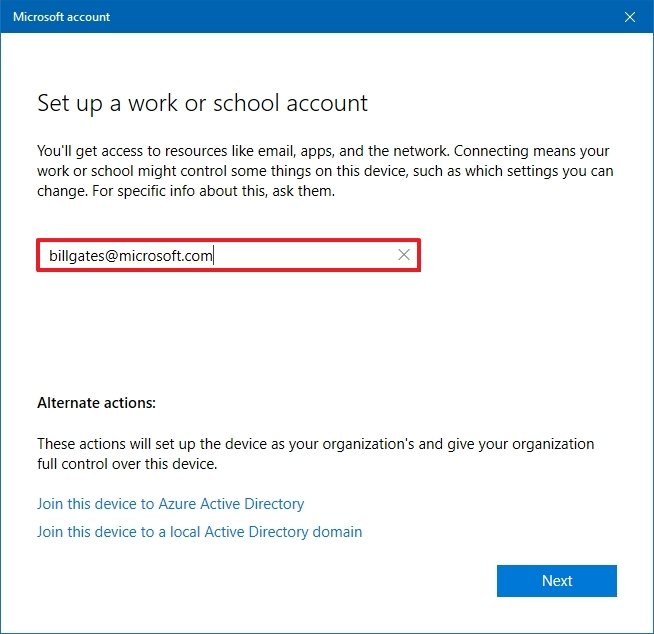 Source: Windows Fundamental
 Quick note: You lot tin also select the pick to join an Azure Active Direction or local Agile Directory domain from this page.
- Click the Adjacent button.
- Proceed with the on-screen directions (if applicative).


Afterwards you complete the steps, you volition have access to the organization's resources as configured past the network ambassador. Unremarkably, these are not settings you lot'll be customizing on a figurer yous apply at dwelling house.
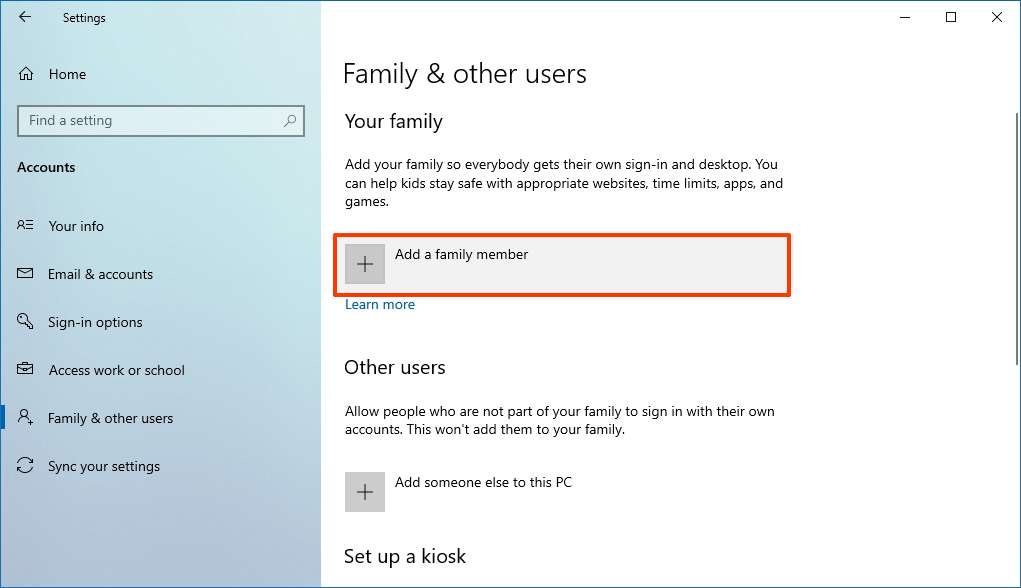
How to create multiple accounts on Windows 10
If you accept to share a computer with multiple people, the "Family unit & other people" page includes the settings to add together, remove, and manage multiple user accounts.
Add family accounts
Nether the "Your family" department, you can add family members to the device, allowing each person to have their own feel, settings, apps, and a place to store files separately from everyone else.
You can add together two types of family accounts, including a "Child" and "Adult," and each business relationship type provides unlike features.
Creating kid account
On Windows 10, a Child account provides a controlled environment with features to keep immature members rubber while using apps, playing games, and browsing the internet. When using this account type, the person will be able to use the computer, personalize the desktop, launch applications, create and shop files, and safely scan the net using Microsoft Edge. Also, you'll be able to control their activities, enforce limits on apps and games, control screen time, and more than using the Microsoft family dashboard online.
To create a child account on Windows 10, use these steps:
- Open up Settings.
- Click on Accounts.
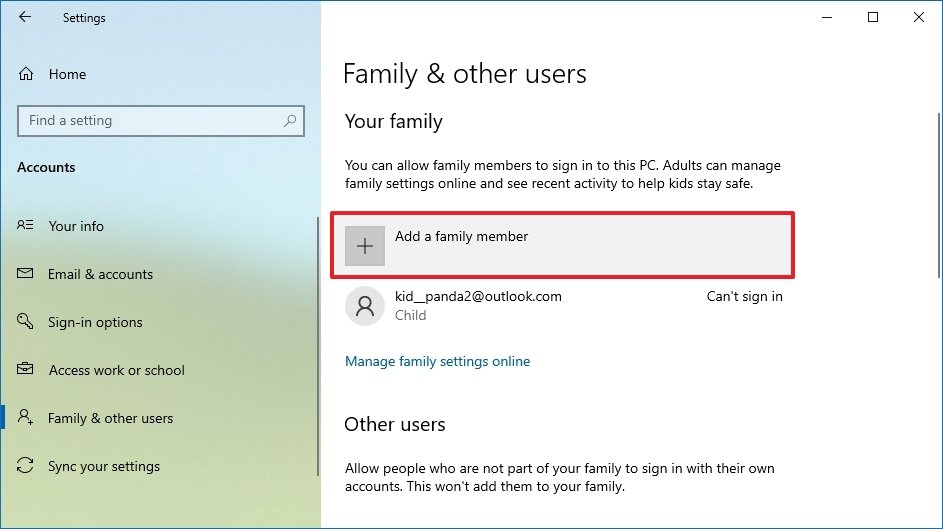
- Click on Family & other users.
-
Nether the "Your family" section, click the Add a family fellow member button.
 Source: Windows Central
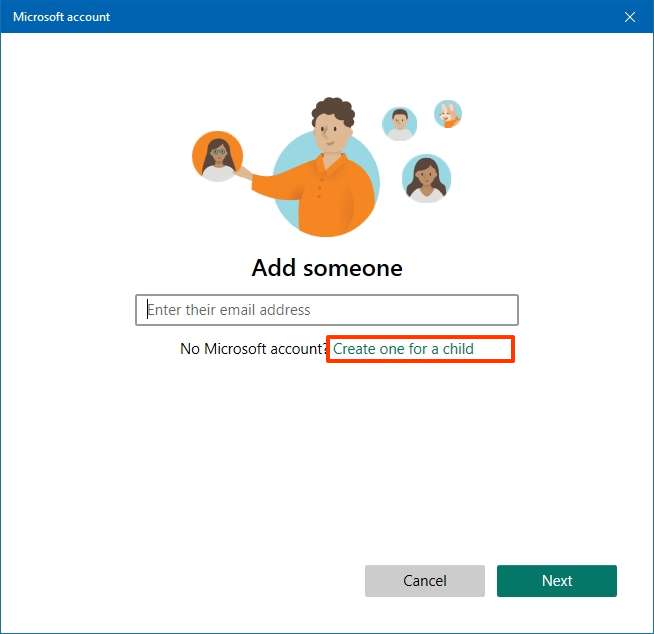
 Quick note: If the young person already has an business relationship, yous can enter it in the electronic mail field to continue with the setup.
-
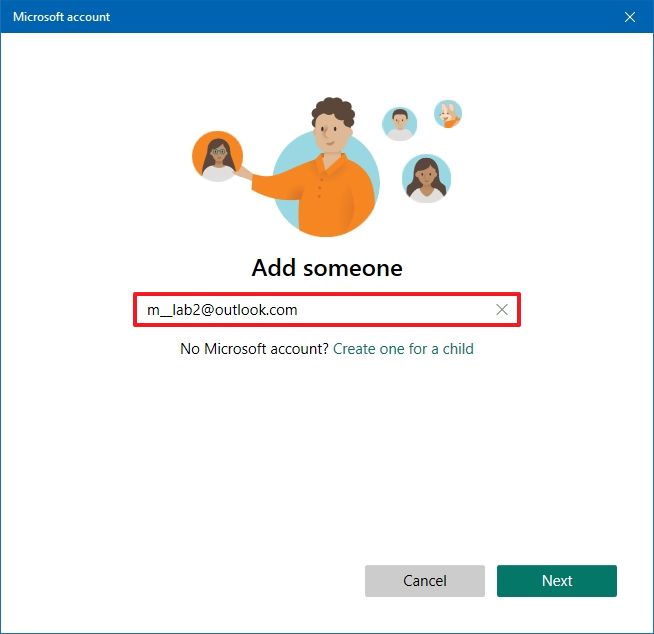
Click the Create one for a kid option.
 Source: Windows Fundamental
 -
Confirm the electronic mail address of the immature person you want to add.
 Source: Windows Central
 - Click the Next push.
- Create a new password for the child'southward account.
- Click the Next button.
-
Confirm the proper noun of the person.
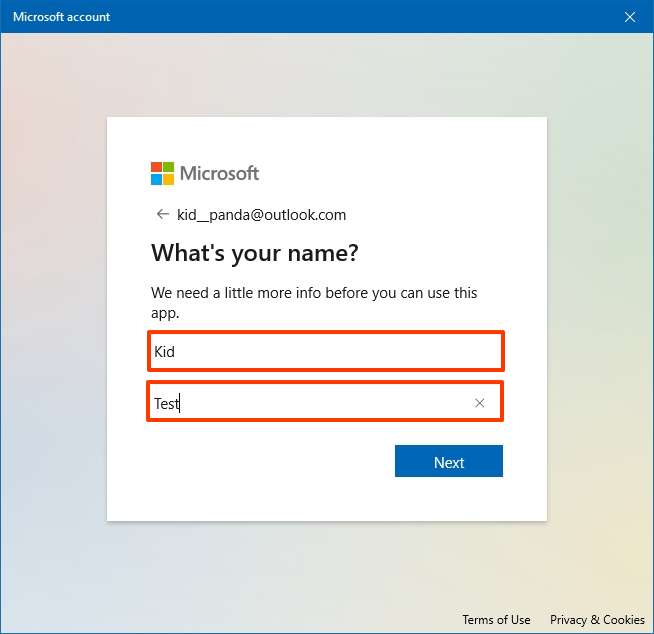 Source: Windows Key
 - Click the Next button.
-
Ostend the person's birthday.
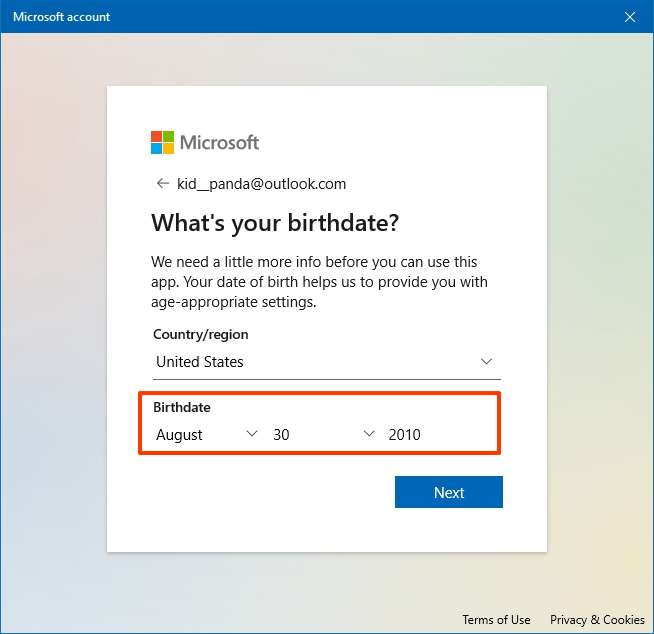 Source: Windows Central
 - Click the Next button.
-
Confirm the newly created email business relationship.
 Source: Windows Cardinal
 - Click the Next button.
- Confirm the countersign.
- Click the Sign in button.
-
Ostend the parent or guardian's consent.
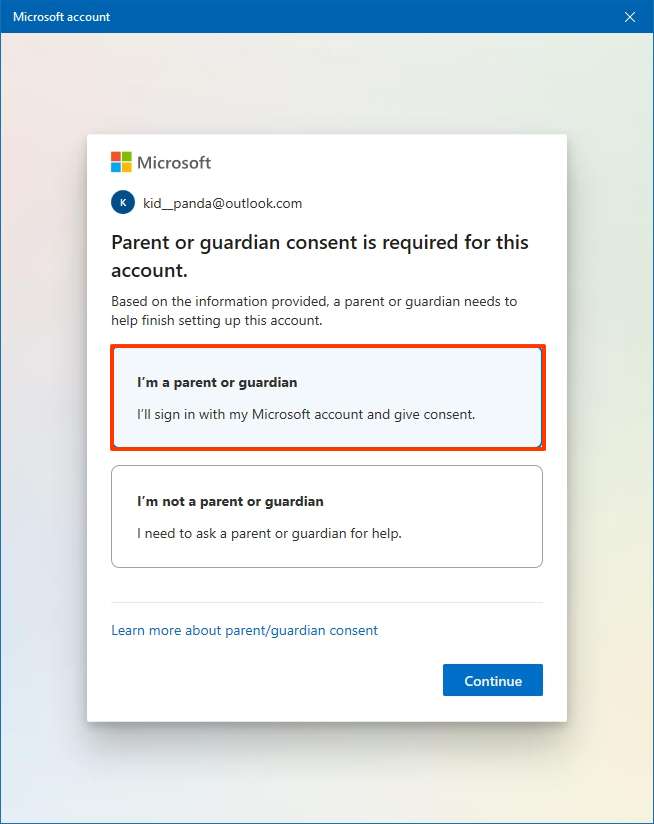 Source: Windows Cardinal
 - Click the Continue push button.
-
Confirm your parent or guardian email business relationship.
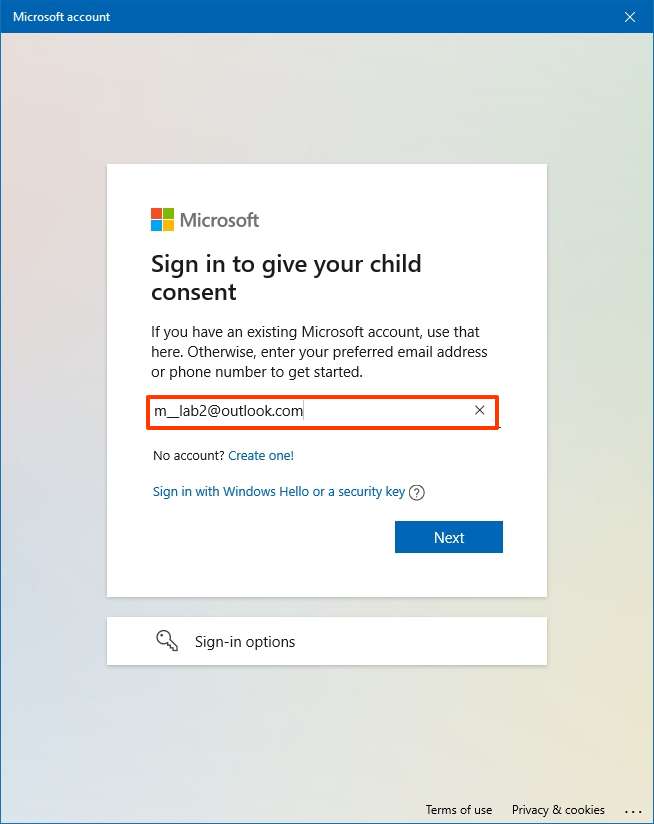 Source: Windows Central
 - Click the Adjacent push.
-
Sign Microsoft'south consent form by typing your proper noun as shown in the form.
 Source: Windows Central
 - Click the Yes, I agree button.
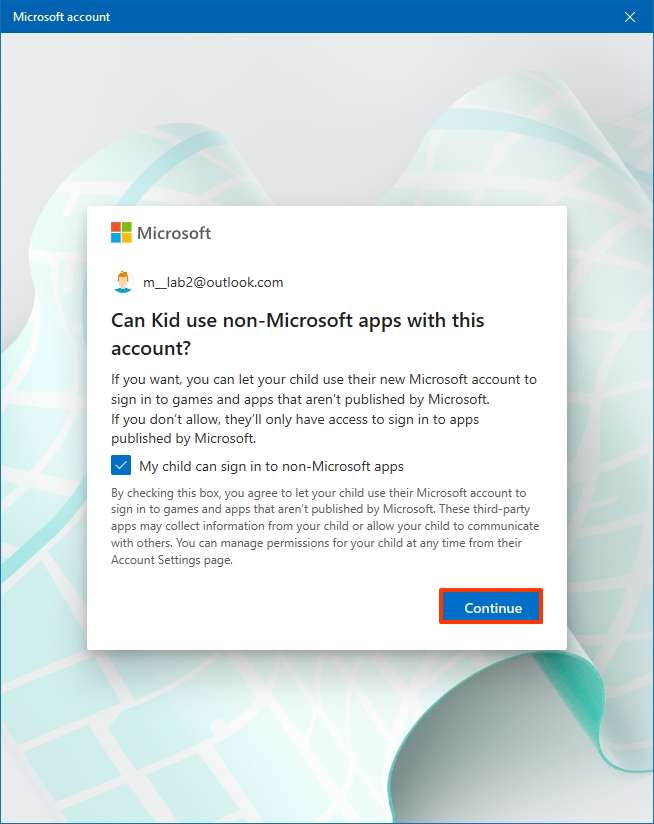
- (Optional) Articulate the My child can sign in to not-Microsoft apps option.
-
Click the Proceed button.
 Source: Windows Key
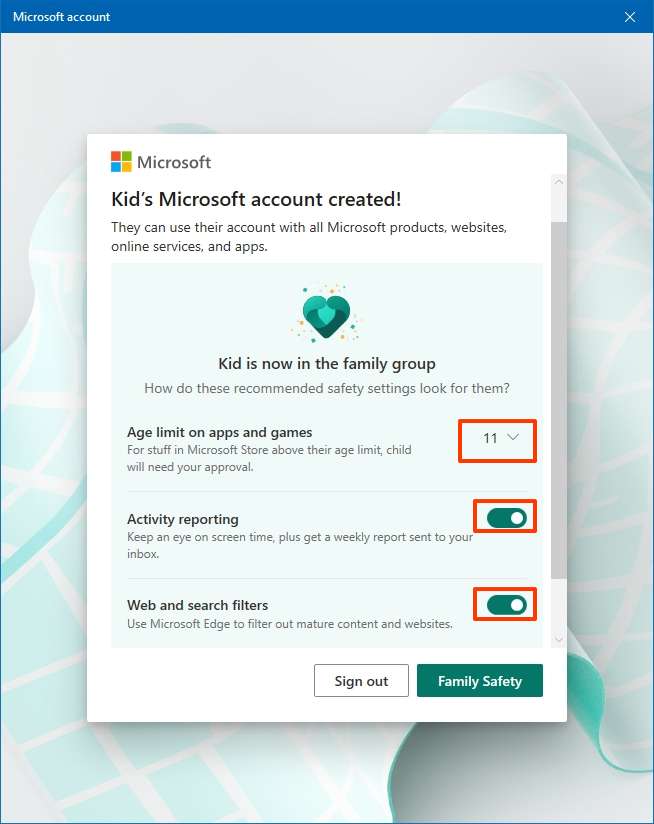
 - (Optional) Confirm the age limit for apps and games.
- Turn on the Activity reporting toggle switch.
-
Plow on the Web and search filters toggle switch.
 Source: Windows Cardinal
 - Click the Sign out button.


In one case you consummate the steps, the business relationship with limited access will be configured on Windows 10, and the user will be able to sign in immediately.
If you have to configure a child-friendly account in Windows 10, this guide walks yous through everything you need to know.
Create adult account
An adult account is very similar to a traditional profile. However, calculation someone as role of your family allows them to manage child accounts.
To create an developed business relationship on Windows 10, apply these steps:
- Open Settings.
- Click on Accounts.
- Click on Family & other users.
-
Under the "Your family" section, click the Add a family fellow member selection.
 Source: Windows Primal
 -
Ostend the family fellow member's email address you desire to add.
 Source: Windows Central
 - Click the Next button.
-
Select the Organizer option.
 Source: Windows Central
 - Click the Invite button.


After you complete the steps, the new family fellow member will receive an email invitation that they must take to use the figurer and manage parental command settings using the online dashboard.
Similar to a traditional account, this account is a Standard blazon, which allows the user to complete well-nigh tasks. However, they can't change security settings, install apps, or modify anything that could affect other users.
If you desire to change the business relationship type, you can acquire more almost this procedure in this guide.
Creating non-family fellow member account
On the aforementioned "Family & other users" page, under the "Other users" section, you lot volition find the settings to create new accounts for people who are non part of your family. Typically, these are the settings yous would use to add anyone to your computer.
Gear up Microsoft business relationship
When y'all need to create a Windows 10 account, using a Microsoft business relationship is the recommended method because it'due south easier to ready up, settings will sync across devices, and users can recover their passwords chop-chop.
To add together a new Windows 10 member using a Microsoft account, use these steps:
- Open up Settings.
- Click on Accounts.
- Click on Family & other users.
-
Under the "Other users" section, click the Add together someone else to this PC pick.
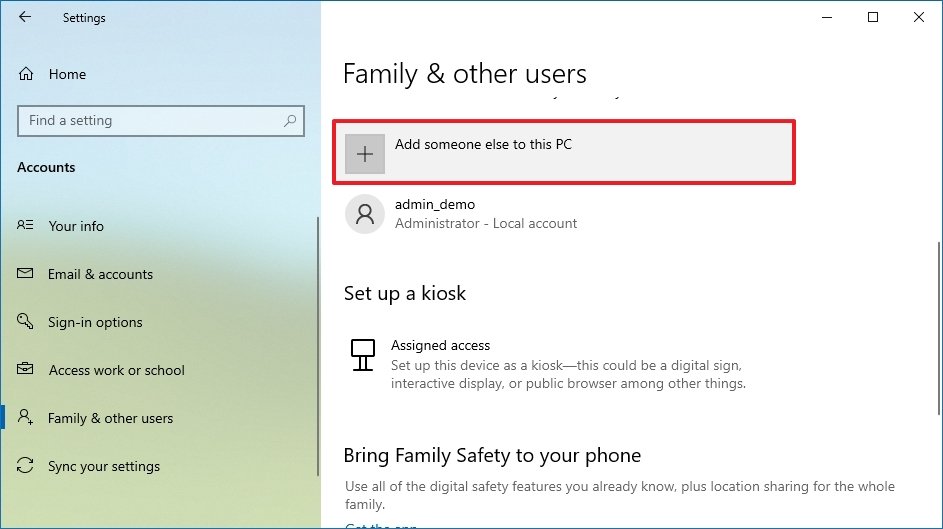 Source: Windows Fundamental
 -
Confirm the electronic mail accost or phone number of the person yous want to add.
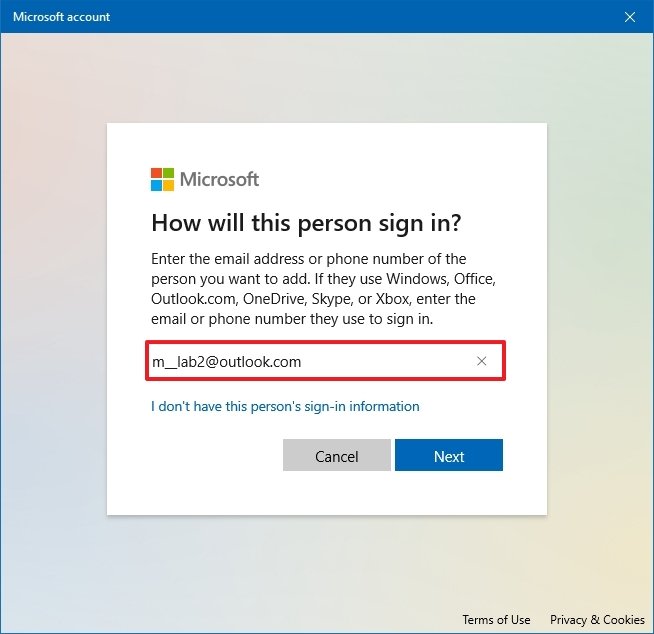 Source: Windows Central
 - Click the Side by side button.
- Click the Finish button.


Once you consummate the steps, the user can start using the device immediately as a standard user. If you desire to change the account type to administrator, you lot need to select the account, click the Change business relationship type button, select the Administrator option, and click the OK push (unremarkably not recommended).
Prepare local account
If yous prefer to use a more traditional business relationship approach, you can nevertheless create a local account without the benefits of cloud integration bachelor with a Microsoft business relationship.
To create a local user account on Windows 10, utilize these steps:
- Open Settings.
- Click on Accounts.
- Click on Family & other users.
-
Under the "Other users" section, click the Add someone else to this PC option.
Source: Windows Central -
Click the I don't have this person's sign-in information option.
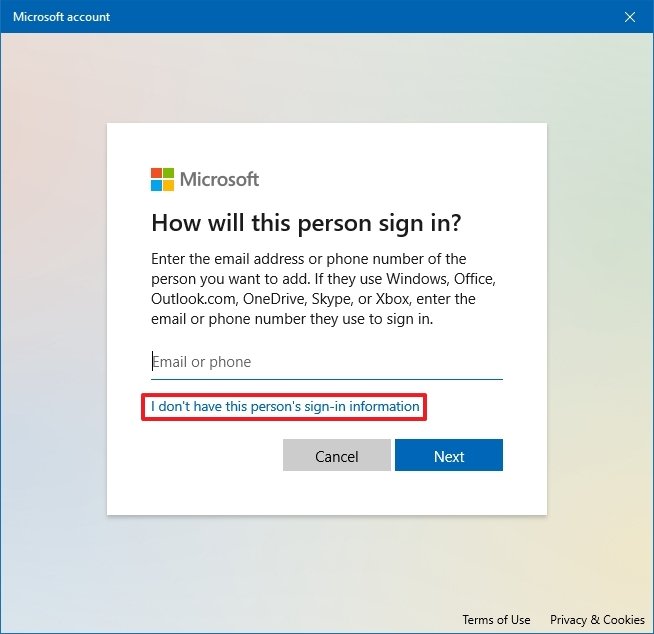 Source: Windows Central
 -
Click the Add a user without a Microsoft account option.
 Source: Windows Cardinal
 - Ostend the username.
-
Create a strong countersign.
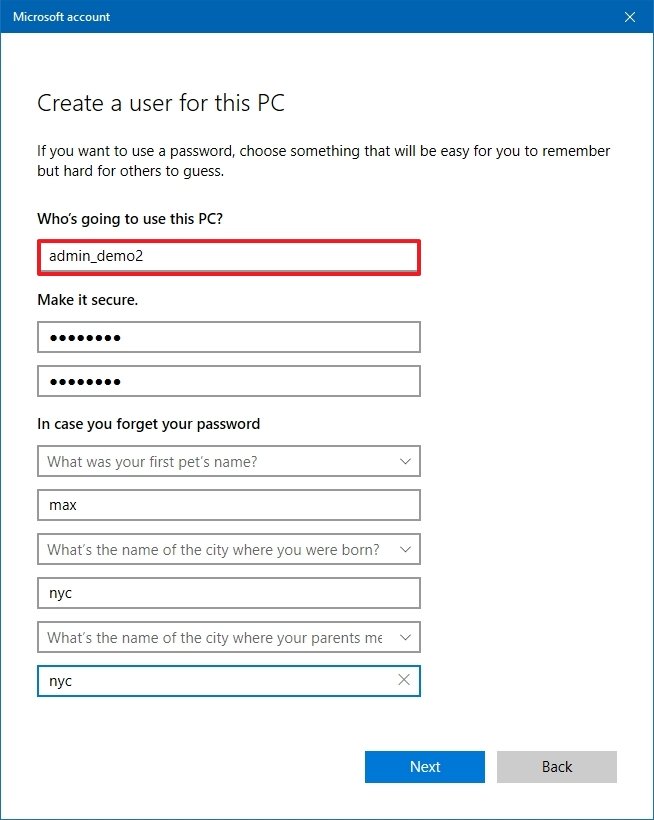 Source: Windows Central
 - Consummate the security questions to accept the ability to reset the password from the Sign-in screen.
- Click the Next button.


After you complete the steps, the local account will be created equally a Standard account type without the benefits of a deject-connected account.
In improver, from this page, you can also set up a kiosk account, which allows network administrators to configure a figurer as a kiosk device to serve a specific purpose in the system.
How to remove an business relationship and data on Windows 10
When you need to delete an account, the steps will be slightly different depending on the blazon of account.
Remove family account
To delete a family member account, utilize these steps:
- Open up Settings.
- Click on Accounts.
- Click on Family & other users.
-
Nether the "Your family" section, click the Manage family settings online selection.
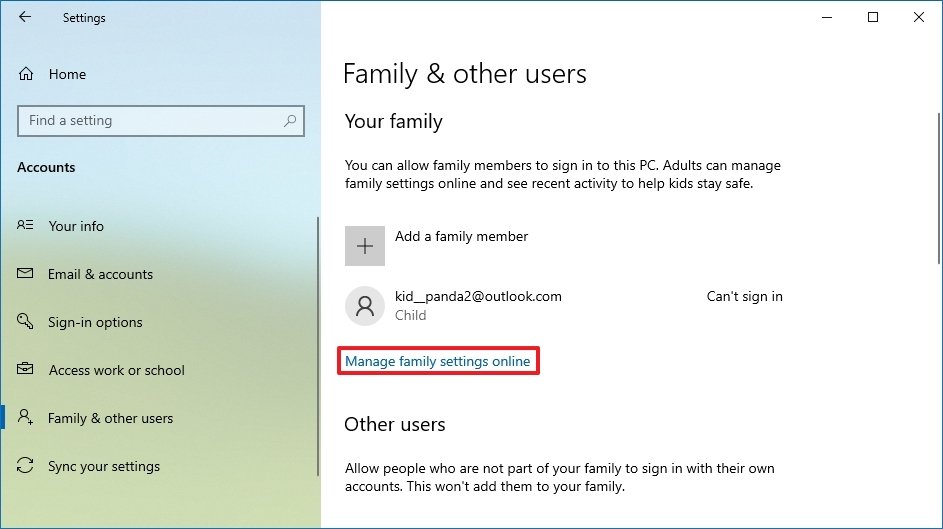 Source: Windows Key
 - Sign in with your Microsoft account (if applicable).
-
Under the "Your family" section, click the bill of fare (3-dotted) card button in the right corner of the user account and select the Remove from family unit grouping option.
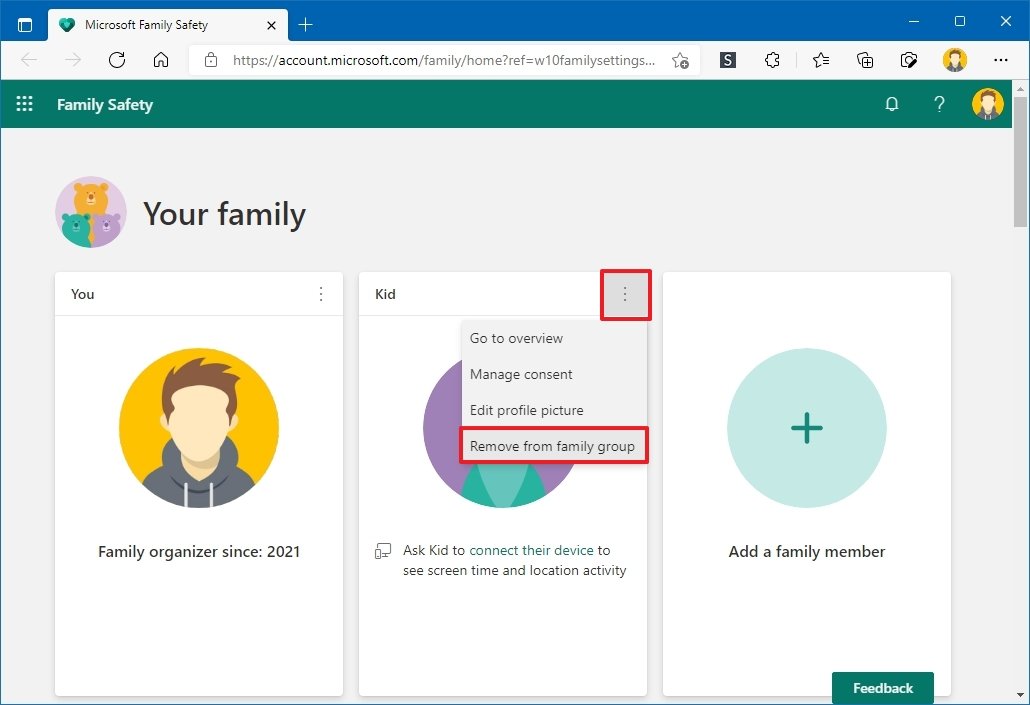 Source: Windows Key
 - Click the Remove button.


Once yous complete the steps, the user account and data will be erased from the device.
Remove non-family account
To remove a local account or Microsoft business relationship, utilise these steps:
- Open up Settings.
- Click on Accounts.
- Click on Family & other users.
- Under the "Other people" section, select the account that you desire to remove.
-
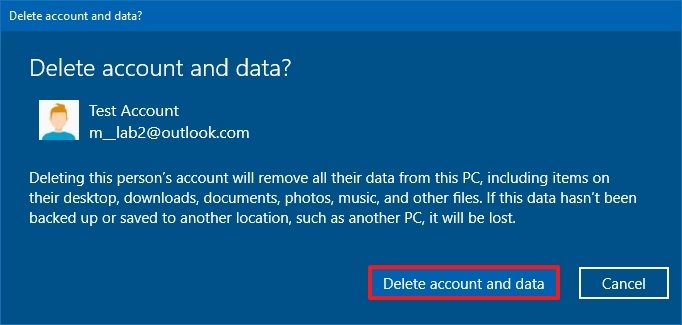
Click the Remove button.
 Source: Windows Cardinal
 -
Click the Delete account and information button.
 Source: Windows Cardinal


After yous complete the steps, the business relationship and information will no longer exist available on the computer.
How to manage account sync settings on Windows x
If you use a Microsoft account, you tin use the "Sync your settings" folio to enable, disable, or specify which settings should sync to the cloud and beyond your laptops, desktops, and tablets.
To alter sync settings on Windows 10, utilize these steps:
- Open up Settings.
- Click on Accounts.
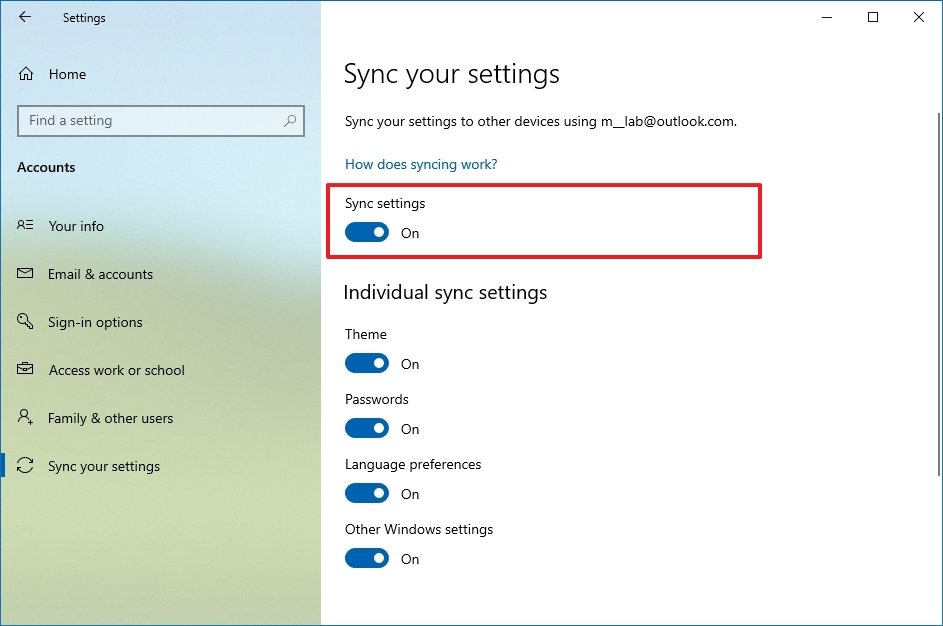
- Click on Sync your settings.
-
Plow on the Sync settings toggle switch.
 Source: Windows Central
 - (Optional) Nether the Individual sync settings section, turn on or off the settings you want to sync.

Once you consummate the steps, merely the settings yous specified volition roam across all your devices.
If yous can't manage these settings, probable, yous haven't verified your account from the "Your info" page, or y'all take one or multiple work or school accounts connected in the "Access work or school" settings page.
More Windows resources
For more than helpful manufactures, coverage, and answers to common questions about Windows ten and Windows 11, visit the following resources:
- Windows 11 on Windows Fundamental — All you demand to know
- Windows 11 help, tips, and tricks
- Windows x on Windows Central — All you need to know

Indefinite greatness
Is Minecraft worth playing in 2022?
Minecraft has dominated the video game industry for well over a decade, but is it still worth playing in 2022? Against all odds, Minecraft has managed to remain relevant with its persistent updates and unique community support.

Information technology eats monsters for breakfast
Xbox Series X ultimate guide: Everything you need to know
Hither'southward everything y'all need to know almost the new-generation Xbox console from Microsoft: Xbox Series 10. This 12TF beast is the most powerful video game panel ever fabricated, and comes with a range of fresh features and nuances to accept your panel gaming to the next level.

How To Set User Name In Windows 10,
Source: https://www.windowscentral.com/how-manage-user-accounts-settings-windows-10
Posted by: schenckthemand.blogspot.com
0 Response to "How To Set User Name In Windows 10"
Post a Comment